The last couple of months, I’ve been working on adding card payments to our product at work. We use Adyen as our payment provider, and they have been great so far.
As I have mostly worked on the backend parts of this integration, I wanted to see if I could build the frontend as well. In this guide, I will share some of the things I’ve learned building just that, a simple payment page using NextJS, the Adyen Node SDK, and the Adyen easy-to-use Drop-in component.
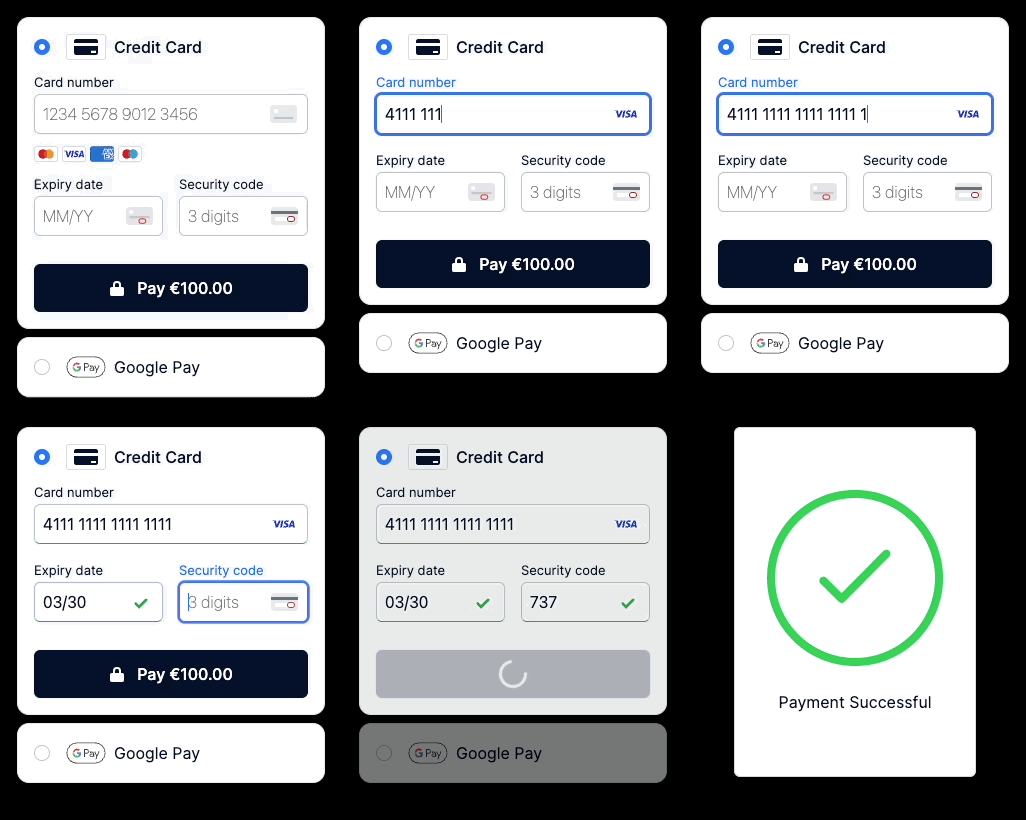
It will look something like this:

Let’s go!
Overview
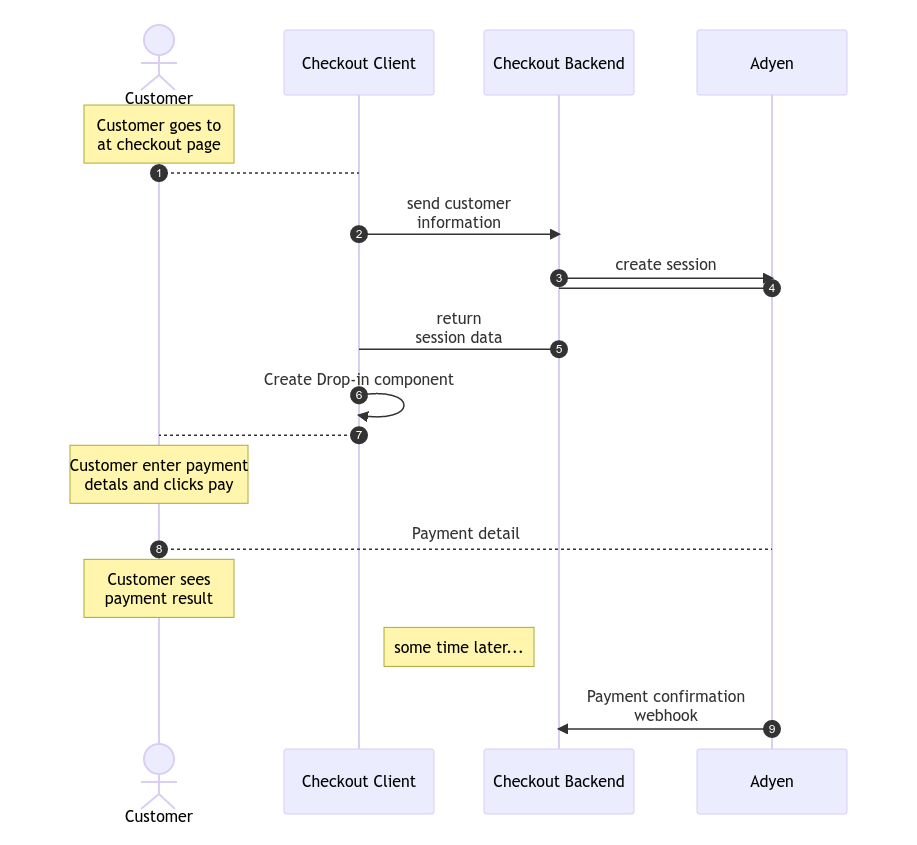
First, let’s go through of the payment flow. Feel free to skip to the next section if you just want to see the code 🤓
The steps
- Customer: goes to the checkout page
- Client (frontend): sends information about the customer to the backend, such as currency, country code and other information to simplify checkout.
- Backend: creates an Adyen session using the Node SDK. In our simple app we will hardcode the amount to 100€, but in a real app you would probably get this from the backend as well.
- Adyen: Returns session data
- Backend: Returns session data to the client
- Client: Creates the Drop-in component using the session data
- Customer: Enters payment details and clicks pay
- Drop-in component: Sends payment details directly to Adyen, without passing our backend. Customer sees payment results.
… (some time later)
- Adyen: Sends payment confirmation webhook to the backend. While there is a
onPaymentCompletehook in the client, it is best practice to rely on these notifications instead.
We will be implementing 1-8 in this guide.

Building the payment page
Now we can start implementing! First, we make sure that we can get an Adyen session to be used with the Drop-in component. This will cover the steps 3-5 from above, i.e.
- Backend: create an Adyen session
- Adyen: Returns session data
- Backend: Returns session data to the client
Implementing the session endpoint
- Initialize the NextJS app - I prefer using typescript, then defaults for everything else.
npx create-next-app@latest --typescript- Install dependencies - For this step, we only need the Adyen Node SDK
npm install @adyen/api-library- Get the API key and merchant from name from the Adyen portal and store them in a
.env.localfile.
# From Developers > API credentials > New API credential > Generate new API key.
ADYEN_API_KEY=<YOUR API KEY>
# From Settings > Merchant accounts. Get the name under "Account code"
ADYEN_MERCHANT_ACCOUNT=<YOUR MERCHANT ACCOUNT>- Create a NextJS endpoint
This will be the endpoint that we will use to get the session data from Adyen. Create a file called pages/api/session.ts.
import type {NextApiRequest, NextApiResponse} from 'next'

import {randomUUID} from "crypto";
import {CheckoutAPI, Client, Config} from "@adyen/api-library";

const config = new Config({
    apiKey: process.env.ADYEN_API_KEY,
    environment: "TEST",
});

// 1. Initialize the client & checkout
const client = new Client({config});
const checkout = new CheckoutAPI(client);

const merchantAccount = process.env.ADYEN_MERCHANT_ACCOUNT ?? "";

// 2. Define the return data
export type SessionData = {
    id: string
    sessionData: string
}

// 3. NextJS handler
export default async function handler(
    req: NextApiRequest,
    res: NextApiResponse<SessionData>
) {

    // 4. Use Adyen SDK to create a session
    const response = await checkout.sessions({
        amount: {currency: "EUR", value: 10000}, // value is 100€ in minor units
        countryCode: "NL",
        merchantAccount,
        reference: randomUUID(), // Merchant reference
        returnUrl: `http://localhost.com`, // Not important for our use case
    });

    // 5. Return the session data to the caller
    res.status(200).json({
        id: response.id,
        sessionData: response.sessionData ?? "",
    })
}- Testing the endpoint
Now we can go to localhost:3000/api/session and see if we get a successful response. If we do, we can move on to the next step.
Example response:
{
  "id": "CS2CD25B27F3052E4B",
  "sessionData": "Ab02b4c0!n5HRZtzi1M4M..."
}
Implementing the payment page
Now that we can fetch session data, we can start build the payment page. We need to install two libraries, swr for fetching data from the backend, and adyen-web for the Drop-in component.
npm install swr
npm install @adyen/adyen-web
Next, generate a client key in the Adyen portal, and add the two following variables to .env.local. They will be used by the Drop-in component.
# Change to LIVE in production
NEXT_PUBLIC_ADYEN_ENVIRONMENT="TEST"
# From Developers > API credentials > Select your user
#  > Client settings > Generate client key
NEXT_PUBLIC_ADYEN_CLIENT_KEY="test_2C8...."
Create a file src/components/Checkout.tsx and add the following code. This will be the payment page. (Inspired by Adyen’s own example repo, and specifically this file.)
import React, {useEffect, useRef} from "react";
import AdyenCheckout from "@adyen/adyen-web";
import "@adyen/adyen-web/dist/adyen.css";
import {Fetcher} from "swr";
import {SessionData} from "@/types";
import useSWRImmutable from "swr/immutable";


export const PaymentContainer = () => {
    return (
        <div id="payment-page">
            <div className="container">
                <Checkout/>
            </div>
        </div>
    );
}

const fetcher: Fetcher<SessionData, string> = (...args) =>
    fetch(...args).then((res) => res.json())

type PaymentCompleteResponse = {
    resultCode: "Authorised" | "Refused" | "Cancelled" | "Error";
    sessionDate?: string;
    sessionResult?: string;
}


const Checkout = () => {
    const paymentContainer = useRef(null);
    const {data: session, error} = useSWRImmutable('/api/session', fetcher)

    useEffect(() => {
        let ignore = false;

        if (!session || !paymentContainer.current) {
            return;
        }

        const config = {
            environment: process.env.NEXT_PUBLIC_ADYEN_ENVIRONMENT,
            clientKey: process.env.NEXT_PUBLIC_ADYEN_CLIENT_KEY,
        }


        const createCheckout = async () => {
            console.log('create checkout')
            const checkout = await AdyenCheckout({
                ...config,
                session,
                onPaymentCompleted: (response: PaymentCompleteResponse, _component: any) => {
                    if (response.resultCode !== "Authorised") {
                        alert(`Unhandled payment result "${response.resultCode}!"`);
                        return
                    }
                },
                onError: (error: any, _component: any) => {
                    alert(`Error: ${error.message}`);
                },
            });


            // The 'ignore' flag is used to avoid double re-rendering caused by React 18 StrictMode
            // More about it here: https://beta.reactjs.org/learn/synchronizing-with-effects#fetching-data
            if (paymentContainer.current && !ignore) {
                console.log('create checkout at the end')
                checkout.create("dropin").mount(paymentContainer.current);
            }
        }

        createCheckout()

        return () => {
            ignore = true;
        }
    }, [session])

    if (error) return <div>Failed to load</div>
    if (!session) return <div>Loading...</div>

    return (
        <div className="payment-container">
            <div ref={paymentContainer} className="payment"></div>
        </div>
    );
}
Then we use the component in pages/index.tsx:
import {Inter} from 'next/font/google'
import {PaymentContainer} from "@/components/Checkout";

const inter = Inter({subsets: ['latin']})

export default function Home() {
    return (
        <main className={`flex min-h-screen flex-col items-center justify-between p-24 ${inter.className}`}>
            <PaymentContainer/>
        </main>
    )
}
Now, start your application (npm run dev) and go to http://localhost:3000 and you should see the payment page:

Make a test payment
Finally, we can use the test card numbers from Adyen’s documentation to make a test payment. My favorite is dutch Visa card:
- Card number: 4111 1111 1111 1111
- Expiry date: 03/30
- CVC: 737

Success 🎉
Summary
We have created a payment page with the Drop-in component and made a test payment. I did not cover any advanced authorization methods (Klarna, PayPal, etc) or how to handle the payment result. I hope this post has given you a good starting point for integrating Adyen.
All and all. I think Adyen is a great payment provider. The documentation is good, and the Drop-in component is easy to use. Their test environment is excellent, and their web UI is great as well.
Links
- Adyen: Web Components integration guide - A good guide how to set up the Drop-in component. Definitely worth a read
- Github: adyen-examples/adyen-react-online-payments - Example of using the Drop-in component with React.
- Github: magnuswahlstrand/nextjs-with-adyen - Repo for this post