I have been using React and React Query for most of my hobby projects lately. I mainly use Typescript, and one of main pain points for me with React Query is the amount of work needed to get the typing right.
Yesterday, Dax Raad from the Serverless Stack team pointed me in the direction of the tRPC project. It is a framework creating typesafe client and server code in Typescript. tRPC is a great fit for me as it has
- great integration with React and React Query and
- an adapter for AWS Lambda and the AWS Gateway
In this post, I will show you how to set up a typesafe API in Typescript, with React in the frontend with AWS Lambda in the backend using tRPC as the glue.
Intro to tRPC
Before we start building anything, let us do a quick intro to tRPC. The goal of the package as state in the documentation:
tRPC allows you to easily build & consume fully typesafe APIs, without schemas or code generation.
The name comes from Typescript + Remote Procedure Call (RPC). The latter simply means that a program call in one place (e.g. in the browser) is executed somewhere else (e.g. on a server).
In our case, it can look like this. We have a procedure called "hello" that takes an object of type {name: string} and returns an object of the type {message: string}.
export function Hello() {
  const hello = trpc.useQuery(["hello", { name: "Magnus" }]);
  if (!hello.data) return <div>Loading...</div>;

  return <div>{hello.data.message}</div>;
}
What happens behind the scenes is that tRPC will convert the client call to an HTTP request, send it to the server, where it is converted back to typescript.
import * as trpc from "@trpc/server";
import { z } from "zod";
import { awsLambdaRequestHandler } from "@trpc/server/adapters/aws-lambda";

const appRouter = trpc.router().query("hello", {
  input: z.object({
    name: z.string(),
  }),
  async resolve(req) {
    return { message: `Hello, ${req.input.name}!` };
  },
});
First it is validated (and type narrowed to {name: string}), and then we can use the typed object as req in our application code in the resolve-function.
There are two variants or RPCs in tRPC: query (read) and mutation (write). This table shows the mapping to HTTP requests.
| HTTP Method | Mapping | Notes |
|---|---|---|
GET | .query() | Input JSON-stringified in query param. e.g. myQuery?input=${encodeURIComponent(JSON.stringify(input)) |
POST | .mutation() | Input as POST body. |
Those are the basics of tRPC. Let’s start building things!
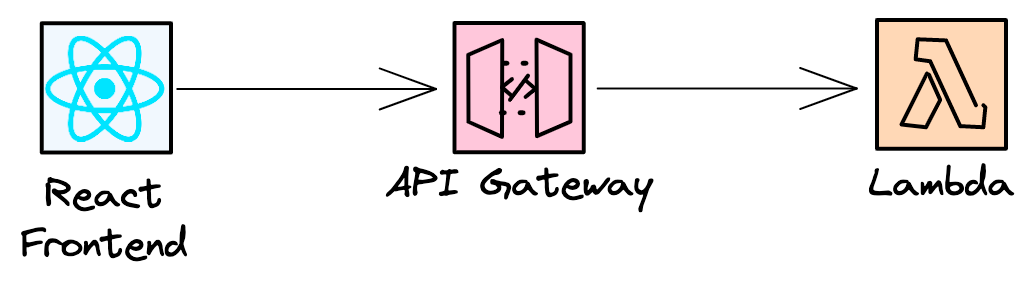
Overview
Here is our target setup:

We will use Serverless Stack to bootstrap and deploy our application. It is a neat little framework that is built on top of AWS Infrastructure as Code tool CDK. It comes with a lot of useful features for rapid development, such as hot reload and setting breakpoints directly in lambda code, and has great CDK constructs for deploying static sites.
Set up
First we need to set up our project and install the dependencies.
# Initialize the Serverless Stack based on the typescript-starter
npm init sst typescript-starter typesafe-client-serverless

# Install the tRPC server package in the root of the project
cd typesafe-client-serverless
npm install @trpc/server
# Create a React app in ./frontend, with the Typescript template.
npx create-react-app frontend --template typescript --use-npm
# Install the tRPC react and client packages and react-query
# in the ./frontend directory
cd frontend
npm install @trpc/client @trpc/react react-query
# We also need static-site-env from serverless stack
# to the API URL into our React app
npm install @serverless-stack/static-site-env --save-devFinally, we go into ./frontend/package.json and replace the start command
"scripts": {
-   "start": "react-scripts start",
+   "start": "sst-env -- react-scripts start",
    "build": "react-scripts build",
    "test": "react-scripts test",
    "eject": "react-scripts eject"
},
Note: if you have jq installed, you can use
jq '.scripts.start="sst-env -- react-scripts start"' package.json > package.jsonInspecting the stack
If we look inside ./stack/MyStack.ts, we see the stack created by sst init. Does three things:
- Create an API Gateway with a route to
GET / - Point that route to the serverless function defined in
handlerwith code atfunctions/lambda.ts - Output the API Gateway URL
import { StackContext, Api } from "@serverless-stack/resources";

export function MyStack({ stack }: StackContext) {
  const api = new Api(stack, "api", {
    routes: {
      "GET /": "functions/lambda.handler",
    },
  });
  stack.addOutputs({
    ApiEndpoint: api.url,
  });
}
We can now deploy the stack to AWS. SST makes this easy for us.
Note: The first time you deploy, it will ask you for an environment. I will use the default magnus here.
npm start

> typesafe-client-serverless@0.0.0 start
> sst start


...

✅  magnus-typesafe-client-serverless-MyStack

Stack magnus-typesafe-client-serverless-MyStack
  Status: deployed
  Outputs:
    ApiEndpoint: https://lbm0pu9312.execute-api.us-east-1.amazonaws.com


==========================
 Starting Live Lambda Dev
==========================

SST Console: https://console.sst.dev/typesafe-client-serverless/magnus/local
Updating the stack
We need to make some changes to our stack:
- Enable CORS for the API Gateway
- Add
ReactStaticSitepointing to ourfrontenddirectory. - (optional) add the
site.urlto the stack outputs
-import {Api, StackContext} from "@serverless-stack/resources";
+import {Api, ReactStaticSite, StackContext} from "@serverless-stack/resources";


export function MyStack({stack}: StackContext) {
  const api = new Api(stack, "Api", {
    routes: {
-     "GET /": "functions/lambda.handler",
+     "GET /hello": "functions/lambda.handler",
    },
+   cors: true,
  });

+ const site = new ReactStaticSite(stack, "ReactSite", {
+   path: "frontend",
+   environment: {
+     REACT_APP_API_URL: api.url,
+   }
+ })

  stack.addOutputs({
+   SiteUrl: site.url,
    ApiEndpoint: api.url,
  });
}
If we go to our terminal, SST has detected the changes and asks us if we want to redeploy.
Stacks: There are new infrastructure changes. Press ENTER to redeploy.Press Enter and it will deploy our changes.
Building our API
Now, let’s get into the code. This guide is loosely based on the tRPC Quickstart.
The handler (api/functions/lambda.ts) is what will receive our request. This is our backend. In this tutorial we return a simple and friendly "Hello, {name}!" where the name is taken from the request input.
import * as trpc from "@trpc/server";
import { z } from "zod";
import { awsLambdaRequestHandler } from "@trpc/server/adapters/aws-lambda";

// 1. Define the tRPC Router
const appRouter = trpc.router().query("hello", {
  // i.   Define query
  input: z.object({
    // ii.  Input validation and type narrowing
    name: z.string(),
  }),
  async resolve(req) {
    // iii. Application logic
    return { message: `Hello, ${req.input.name}!` };
  },
});

// 2. Define the AppRouter type, needed on the client side
export type AppRouter = typeof appRouter;

// 3. Export the handler.
export const handler = awsLambdaRequestHandler({
  router: appRouter,
});
Let’s see what we have done
- Define the tRPC router
- Here we define that we have a remote procedure call (RPC) that is a
query. The procedure is called “hello”. - We use Zod to define the input types, in this case an object of
type
{name: string}. It does type narrowing for us! - Application logic, e.g. make database requests.
- Here we define that we have a remote procedure call (RPC) that is a
- Define the AppRouter type. This is needed on the client side
- Export the handler. The receiver of
GET /hello
The client (frontend/src/utils/trpc.ts)
Next we create a new file in frontend/src called utils/trpc.ts
import { createReactQueryHooks } from "@trpc/react";
import type { AppRouter } from "../../../api/functions/lambda";

export const trpc = createReactQueryHooks<AppRouter>();
The app (frontend/src/App.tsx)
We set up our tRPC client and React Query client, and wrap our main application <Hello/> in it. We configure
the tRPC client with the URL from the REACT_APP_API_URL that we propagated in the stack.
import React, { useState } from "react";
import { QueryClient, QueryClientProvider } from "react-query";
import { trpc } from "./utils/trpc";

const apiUrl = process.env.REACT_APP_API_URL ?? "";

export default function App() {
  const [queryClient] = useState(() => new QueryClient());
  const [trpcClient] = useState(() =>
    trpc.createClient({
      url: `${apiUrl}`,
    })
  );

  return (
    <trpc.Provider client={trpcClient} queryClient={queryClient}>
      <QueryClientProvider client={queryClient}>
        <Hello />
      </QueryClientProvider>
    </trpc.Provider>
  );
}
Our <Hello/> component is defined in the same file, and we get the pay off for all our hard work. We finally get to
use our typesafe client 🎉!
export function Hello() {
  const hello = trpc.useQuery(["hello", { name: "Magnus" }]);
  if (!hello.data) return <div>Loading...</div>;

  return <div>{hello.data.message}</div>;
}
We call our procedure hello with the (typesafe) argument {name: "Magnus"}. If loading is successful, we get back
a hello.data which is of type {message: string}.
Testing our app
Now, with everything deployed, we can start our React app and go to localhost:3000.
cd frontend
npm start
If everything is configured correctly, you should see the following (perhaps with a different name).

Summary
We have built a simple Hello, <Name>!-app using Typescript, React, SST and tRPC. I think that the code was simple, while getting all the infrastructure up and running more complicated. The upside to all the work we have done is that would have a solid starting point if we want to add more things like databases or messages queues to our app, or publish our site to a custom domain.
Some takeaways for tRPC:
✅ Pros
- Typesafe HTTP requests 🎉
- Good documentation
- Good integration with React and AWS Lambda
❌ Cons
- tRPC is not REST, which most developers are familiar with.
With tRPC, the SST stack needs to know of the internals of the application code (as far as I can tell). The API Gateway endpoint/helloneeds to match call made by tRPC, e.g./helloin the case of our procedure"hello".- Update: Dax Raad informed me that I could use the catchall of
{proxy+}instead of specifying/helloexplicitly.
- Update: Dax Raad informed me that I could use the catchall of
Overall, I had a good time. Hope you did too.